14 Peel and Stick Wallpaper Ideas for Every Room
Renters want a dramatic room change but cannot paint, cannot tile, cannot drill new holes. Peel-and-stick wallpaper is the rental-friendly answer. The trouble is that most lists treat it as one idea (“behind the bed”) instead of fourteen distinct applications across the apartment.
The fourteen below go from the obvious accent walls down to overlooked surprises. Inside drawers, on stair risers, on the ceiling. And they finish with a small-surface refresh for the cabinet or closet door you walk past every day.
By the end, the goal is a Saturday list. Three or four placements that target your specific weakness, whether you want a whole-room dramatic before-and-after, a single-surface low-risk test, or a hidden surprise micro-detail.
For the broader budget refresh playbook with cheap art, picture ledges, paint, color zoning, and layered textiles, the Budget Home Decor playbook is the upstream P3 pillar. This article zooms in on one specific lever applied across fourteen surfaces.
Peel-and-stick wallpaper is the rental-friendly answer for renters who cannot paint, tile, or drill, but most lists treat it as one idea. Each placement below is a specific surface — accent wall, kitchen backsplash, stair risers, ceiling, inside drawers. Pick the three or four that match your apartment and stack from there.
- 1Behind-the-bed — accent wall
- 2Behind-the-sofa — living room anchor
- 3Powder room — full pattern
- 4Kitchen backsplash — counter strip
- 5Stair risers — vertical strips
- 6Inside cabinet doors — subtle reveal
- 7Bookcase backing — depth illusion
- 8Inside drawers — hidden styled
- 9Ceiling — 5th wall accent
- 10Furniture top — dresser refresh
- 11Vanity strip — bathroom quick-fix
- 12Hallway accent — narrow space
- 13Closet interior — surprise reveal
- 14Door panel front — closet refresh
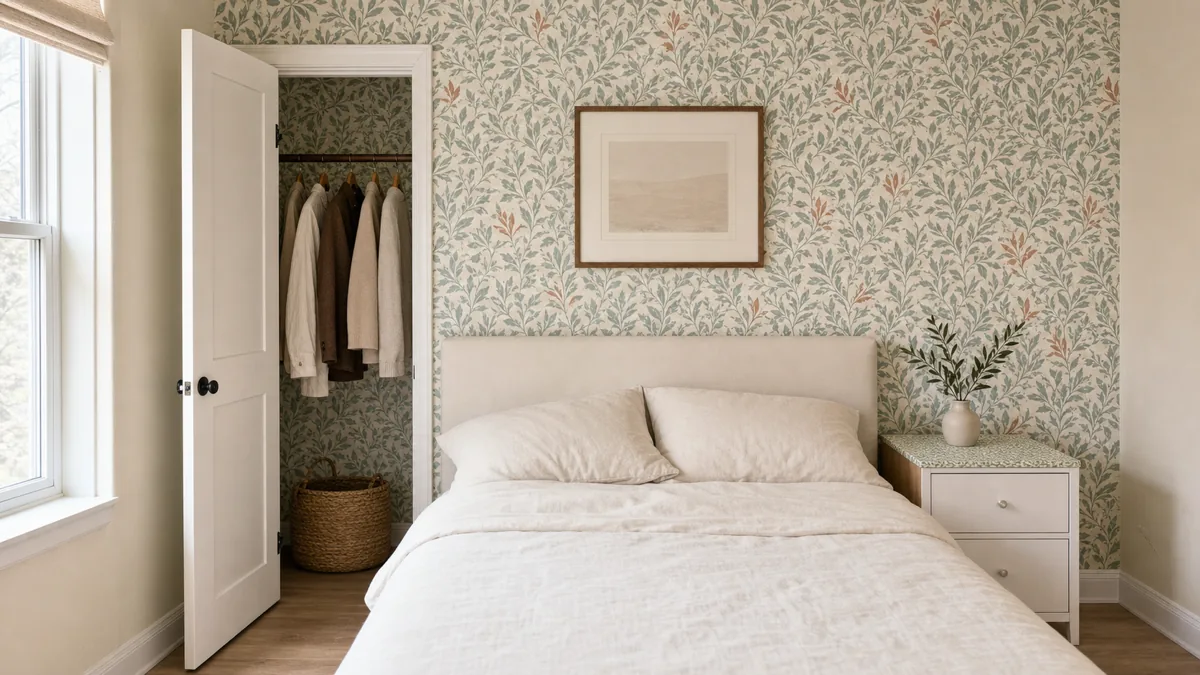
Behind-the-Bed Accent Wall (Biggest Visual Lift)
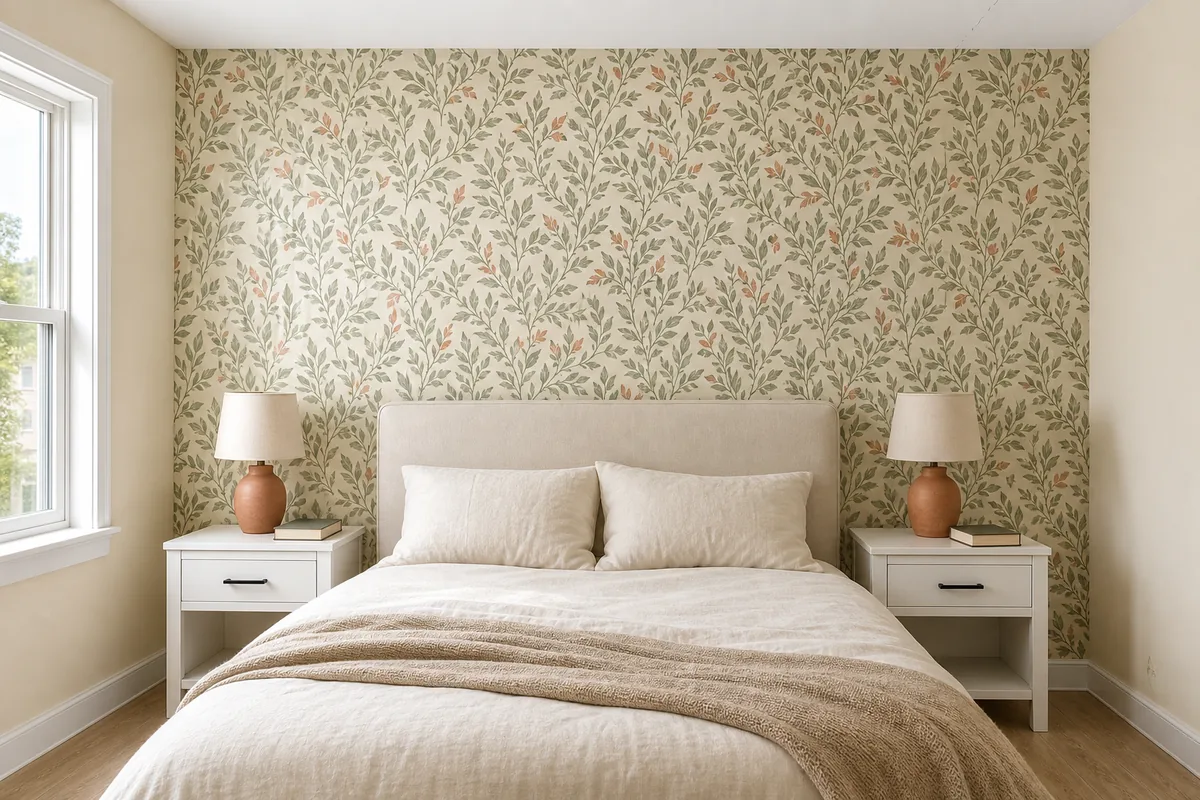
The wall behind the bed is the bedroom’s natural focal point. The eye lands there first when you walk in, before the floor or the ceiling or anything else in the room. Changing one wall changes the whole room without changing anything else.
The rule is one wall only, not all four. Covering all four walls turns a small bedroom into a too-busy box. Covering one wall makes the bed feel intentional and the rest of the room feel quiet. Center the pattern on the visible wall area above the headboard, start at the top corner, and work down with a credit card to smooth bubbles outward.
- Cover the headboard wall only, not all four (the one-wall accent is the renter-safe rule)
- Measure twice, cut once. Pattern repeat eats roll length so buy 25% extra
- Start at the top corner and work down with a credit card to smooth bubbles outward
- Trim baseboard and ceiling edges with a sharp utility knife for crisp finish
- Skip the all-four-walls plan: too committed and visually overwhelming in a small bedroom
- Works on flat-paint or semi-gloss walls; skip textured drywall (poor adhesion)
Behind-the-Sofa Accent Wall (Living Room Anchor)
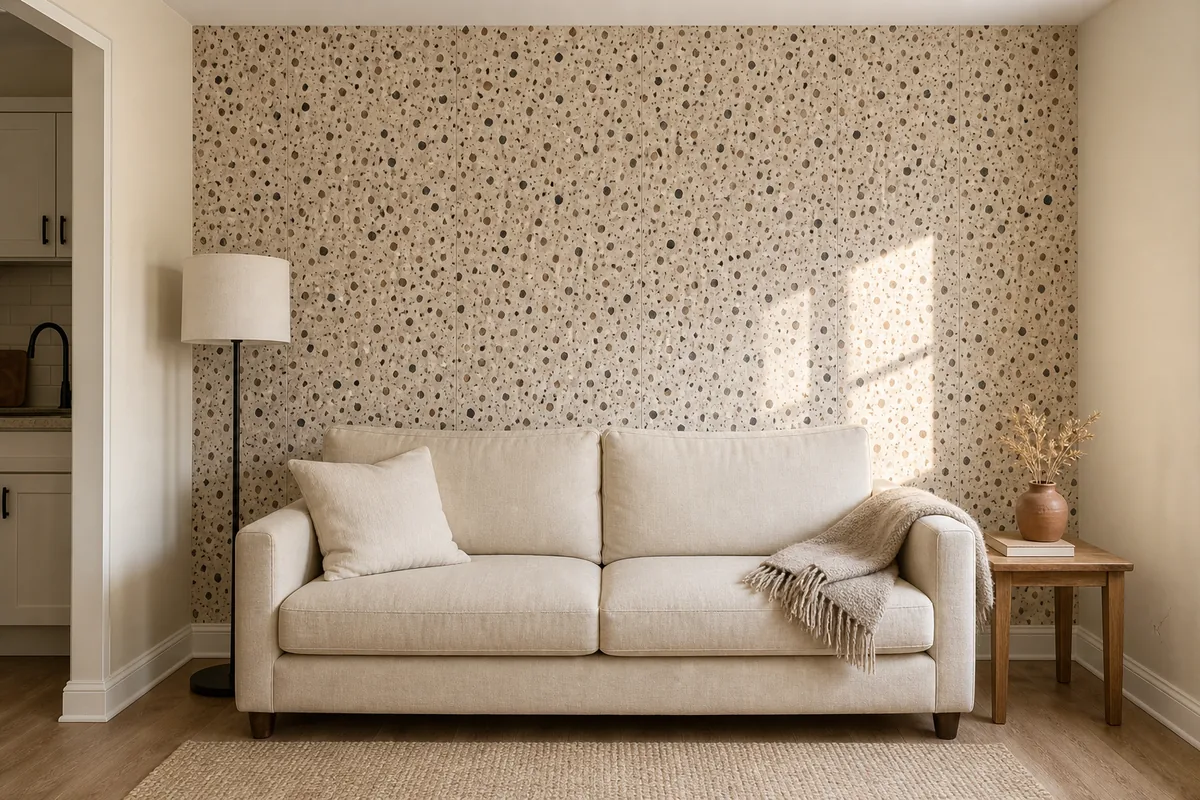
The sofa wall anchors the living room visually. Wallpaper behind grounds the seating area without adding more furniture. This is useful in rentals where you cannot install built-ins or move structural elements.
One wall papered behind the sofa creates the visual weight that custom millwork would provide in a designer home, at a fraction of the cost. Pattern choice matters more here than in the bedroom because the living room is the room visitors see first. An abstract terrazzo, a tonal botanical, or a fine geometric reads sophisticated. A bold floral or maximalist print reads dated within two years.
- Cover the sofa wall only (the one-wall rule applies in living rooms too)
- Center the pattern on the visible wall area (sofa hides the bottom two feet)
- Pair with one neutral throw pillow so the wallpaper is the visual focal
- Skip the wallpaper-plus-gallery-wall combo (visual chaos in a small living room)
- Works best in apartments with one clear sofa-anchor wall, not floating-sofa floor plans
- Pattern choice: abstract terrazzo, tonal botanical, or fine geometric. Avoid maximalist florals
Full-Wallpaper a Powder Room (Small Space = Full Pattern)
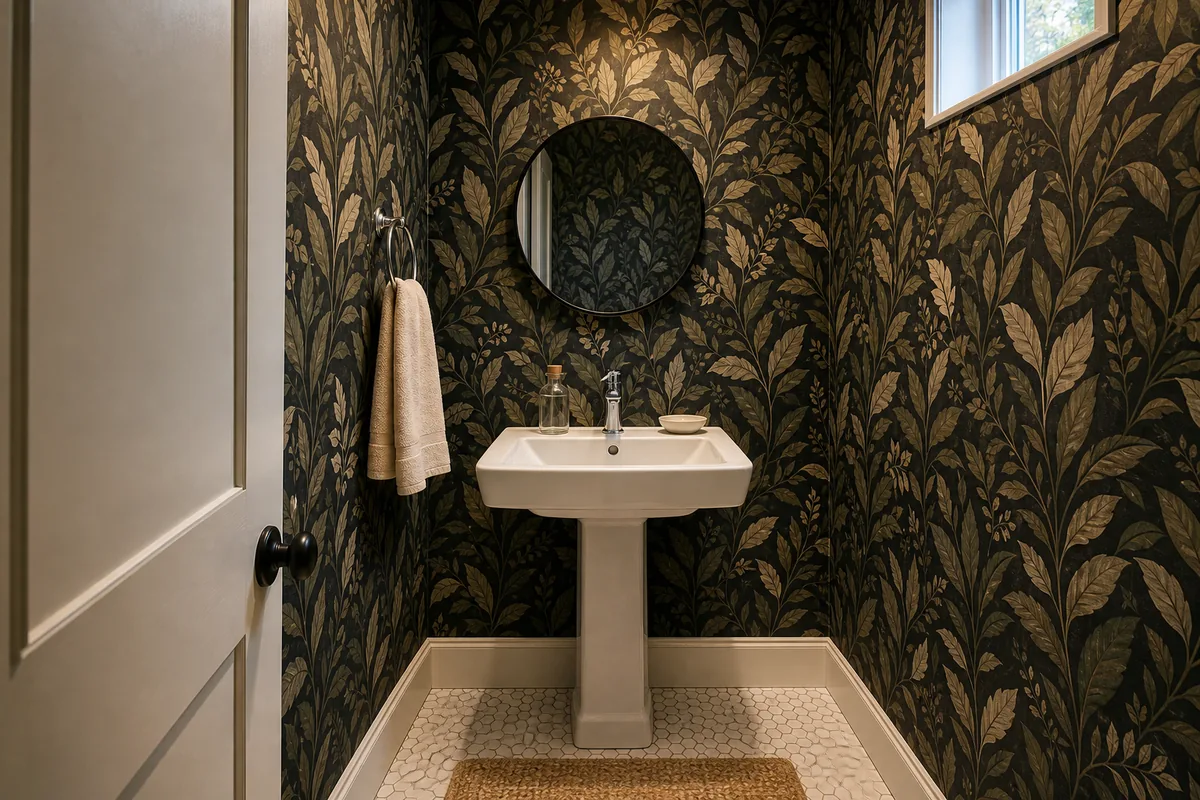
Powder rooms are thirty to fifty square feet. Small enough that a bold pattern across all four walls reads dramatic, not overwhelming. This is the one room in the apartment where full-coverage wallpaper actually works without giving the eye nowhere to rest.
The room is small enough that the pattern becomes the whole experience, like stepping into a curated jewelry box for ninety seconds before returning to the rest of the apartment. Darker patterns work specifically because the room is small. A bold dark sage botanical, a deep terracotta geometric, or a black-and-cream toile all read sophisticated rather than cramped.
- Powder rooms 30-50 sq ft = full-pattern target. Too small for “accent wall” logic anyway
- Corners are the install gotcha. Sharp utility knife to trim where walls meet
- Skip the matching curtain set: wallpaper is the statement, fabric adds visual noise
- Darker patterns work in small bathrooms (cocoon effect, not cramped)
- Paint the ceiling a related neutral to ground the space (avoid stark white)
- Use a water-resistant peel-and-stick rated for bathroom humidity
Not every apartment needs all fourteen placements. The article is built so each idea is a stand-alone surface — pick three or four that target your specific weakness and skip the rest. The four quadrants below cover the most common starting points.
Kitchen Backsplash Refresh (Between Counter and Upper Cabinets)
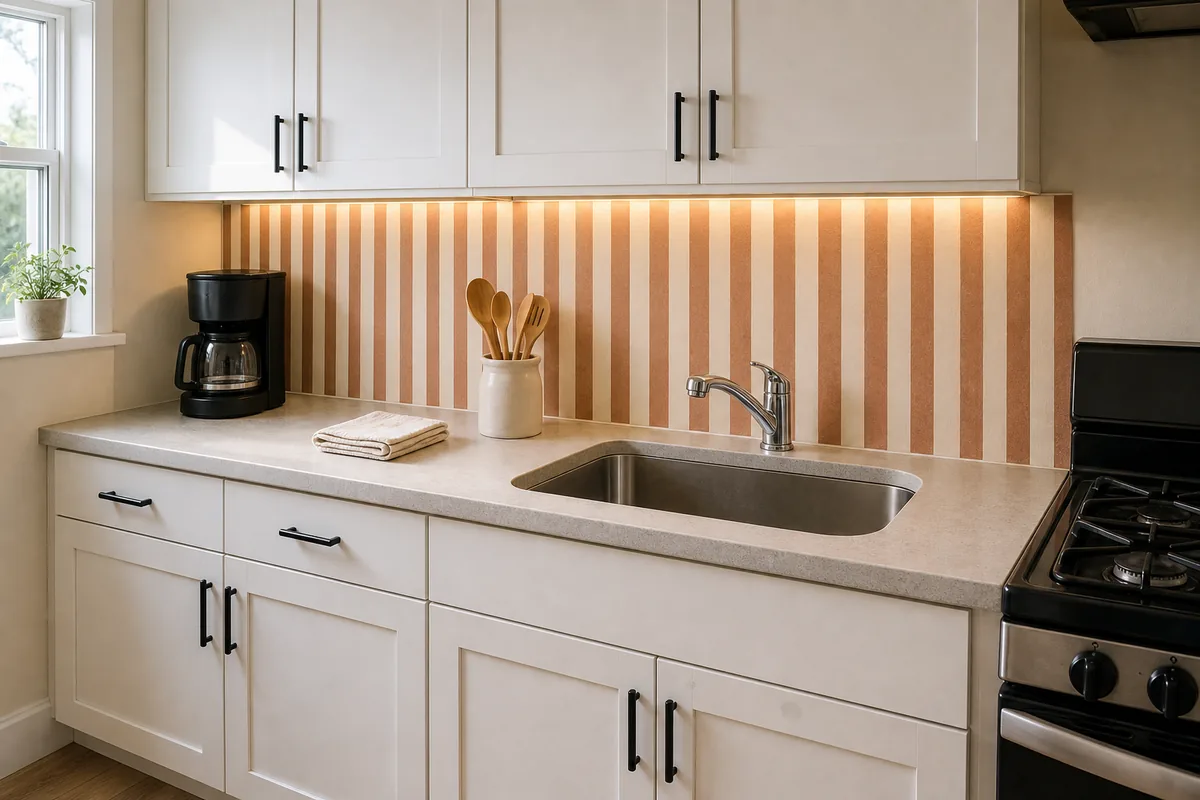
The backsplash strip between the counter and the upper cabinets is one of the most defined surfaces in any kitchen. A horizontal strip eighteen to twenty-four inches tall with crisp edges on every side. This makes it the perfect surface for peel-and-stick because the wallpaper does not need to negotiate uneven boundaries or unpredictable corners.
It is the renter alternative to installing real tile or replacing the existing backsplash, at a tenth of the cost and zero landlord conversations. Measure the counter length times the backsplash height before buying. A typical galley kitchen needs a ten-foot roll. Buy twenty-five percent extra for pattern matching at the seams.
- Measure counter length × backsplash height (typically 18-24″ tall strip)
- Buy 25% extra roll length for pattern matching at vertical seams
- Skip behind the stove. Grease and heat break adhesion within months
- Cover with clear acrylic protector if you must paper behind a cooking zone
- Works as a renter alternative to subway tile or backsplash replacement
- Choose water-resistant peel-and-stick for the kitchen humidity
Stair Risers (Vertical Pattern Strips on Each Step)
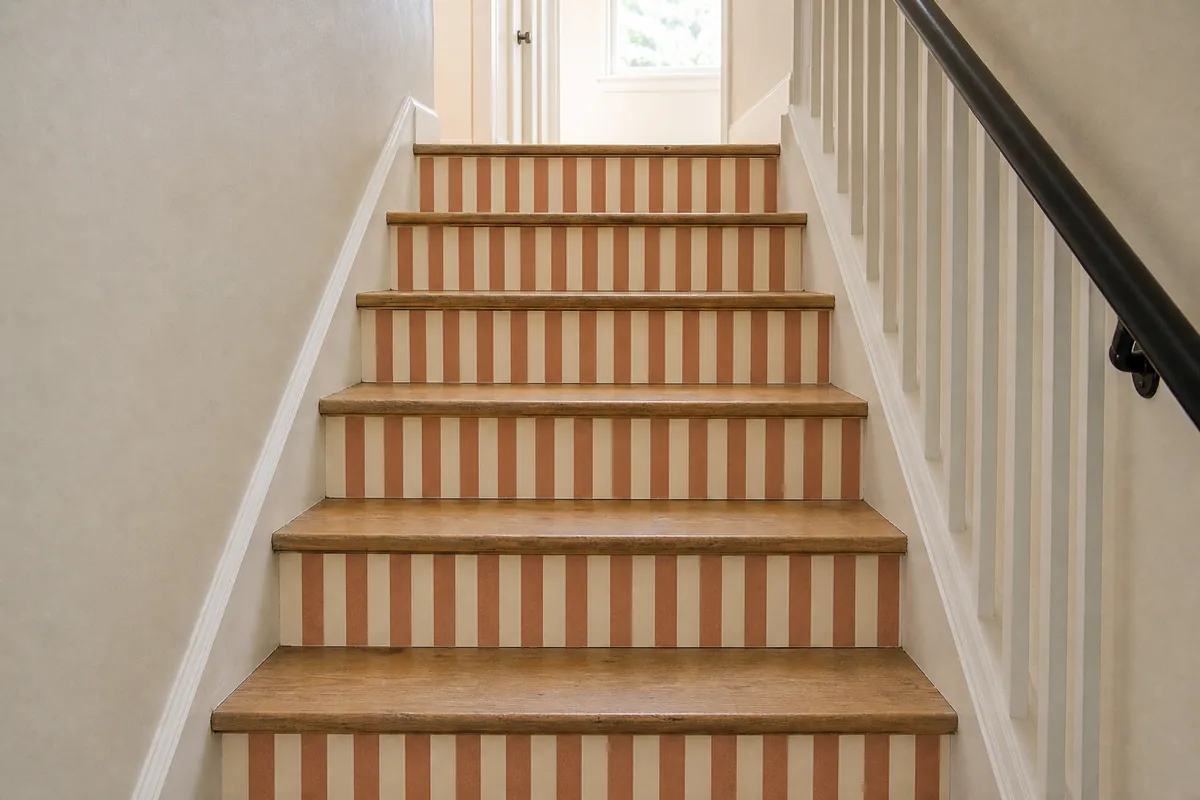
A twelve-step staircase is twelve riser faces. Twelve small surfaces of vertical pattern visible every time you climb or descend. The visual impact is massive for the cost, typically around forty dollars for a small roll covering an entire staircase.
Each riser is small enough that the wallpaper is forgiving of minor cuts and alignment. The pattern reads from the bottom of the stairs as a rhythmic detail you cannot quite identify until you climb up close. Cut wallpaper strips to riser dimensions before applying. Typically six inches by thirty-six inches per step, but measure your specific staircase because rental risers vary.
- Cut strips to riser dimensions (typically 6×36 inches per step)
- Apply one strip per riser face, treads visibly plain
- Skip alternating patterns across risers: visually busy, distracts from the rhythm
- Pair with plain wood or painted treads so the pattern is the focal
- Works on rental staircases. Peels off cleanly when you move out
- Choose a pattern with vertical orientation (stripes or vertical motifs) for stair-foot perspective
Inside Upper Cabinet Doors (Subtle Reveal When Opened)
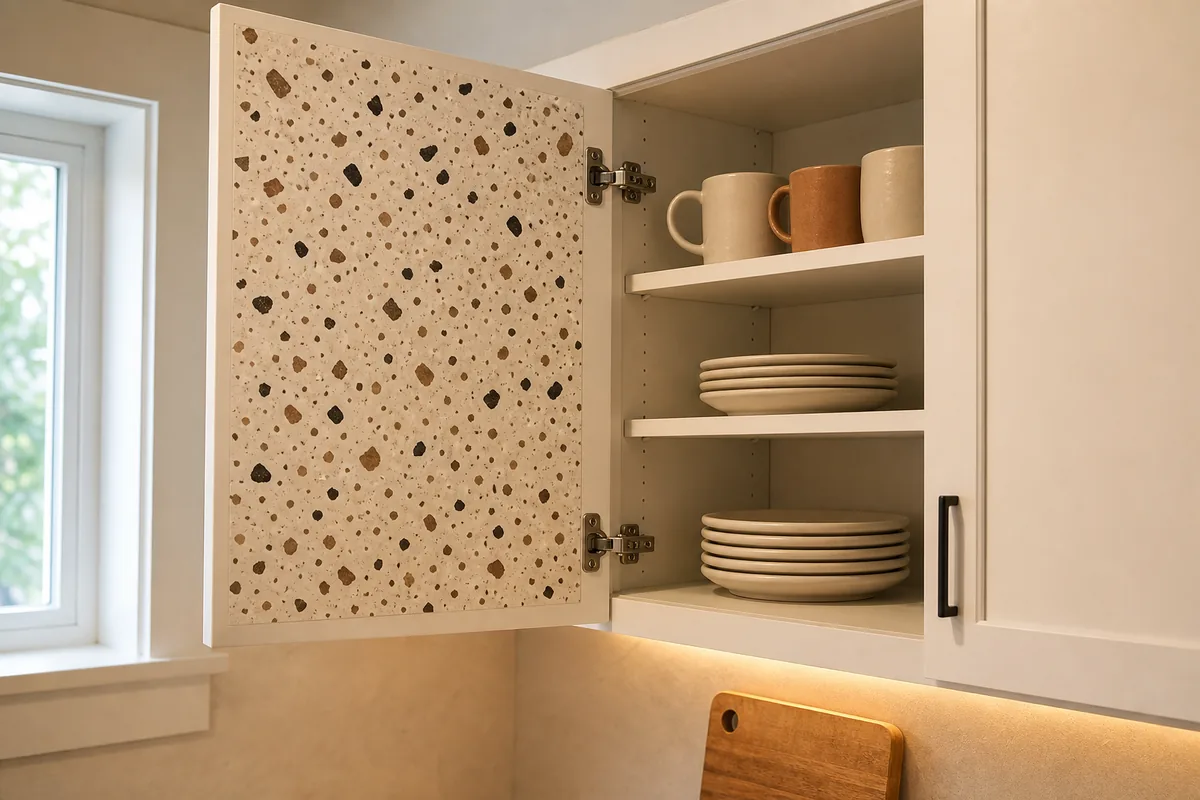
Inside-cabinet wallpaper is the quietest application. Pattern visible only when the door opens, hidden the rest of the time. This makes it the lowest-stakes test for someone who has never installed peel-and-stick before.
If you do not like it, peel it off in five minutes. Nobody else has ever seen it. If you do like it, the pattern adds a moment of pleasure every time you reach for a coffee mug. The contrast between the white shaker exterior and the patterned interior pops the moment the door swings open. The cabinets most worth doing are the ones you do not open every day.
- Cover the inside face of the door, not the front of the door
- Works on white shaker doors particularly well (contrast pops when door opens)
- Skip cabinets you open most often. Door-swing stress causes more peeling
- Ideal candidates: china cabinet, less-used pantry, bathroom medicine cabinet
- Pattern visible only when door is open. Lowest-stakes peel-and-stick test
- Two or three cabinets out of a kitchen creates a surprise; do not paper every cabinet
Bookcase or Open-Shelf Backing (Pattern Behind Objects)
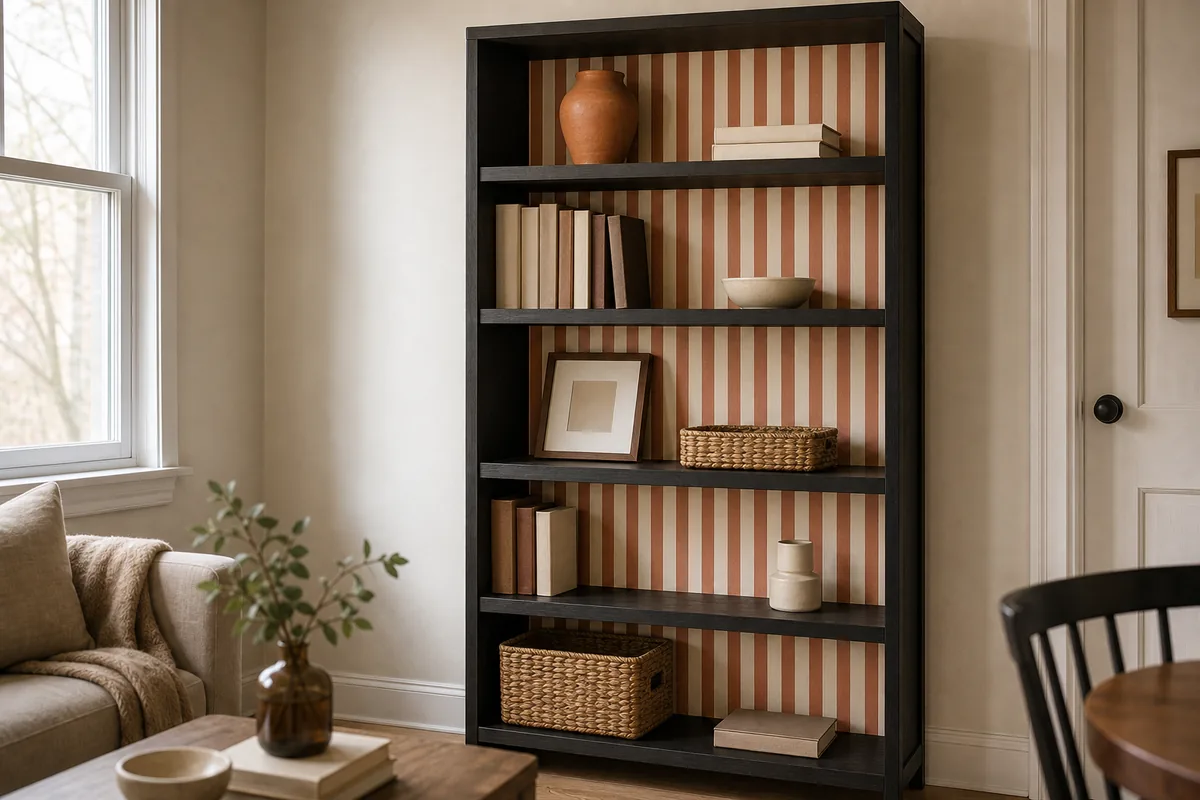
Wallpaper applied to the back of an open bookcase or floating shelf creates depth. Pattern visible between and behind objects, which adds visual interest to a flat shelf wall. This makes a plain rental bookcase feel like a designed built-in.
The mechanism is that the eye reads pattern peeking through gaps as more sophisticated than pattern on a closed surface. The layered visual hierarchy mimics what custom millwork with a painted back panel provides at twenty times the cost. Apply the wallpaper before filling the bookcase with books. Far easier to align without removing everything later.
- Measure the bookcase back panel before buying wallpaper
- Apply BEFORE filling the bookcase with books (easier without contents)
- Works on shelves with at least 30% open visible space
- Skip if the shelf is fully filled. Pattern hidden, defeats purpose
- Pair with mostly-neutral objects on the shelf so the pattern reads
- Bookcase with thin or absent back panel may need a backing board first
Most peel-and-stick wallpaper advice skips the surface prep step and the removal step. The wallpaper goes up easily and either peels off within weeks or rips paint off when you try to remove it cleanly years later. These four rules cover what consistently holds — surface test, surface eligibility, measurement buffer, and slow warm removal — so the install lasts and removes cleanly.
Inside Drawers and Inside Hamper Lining
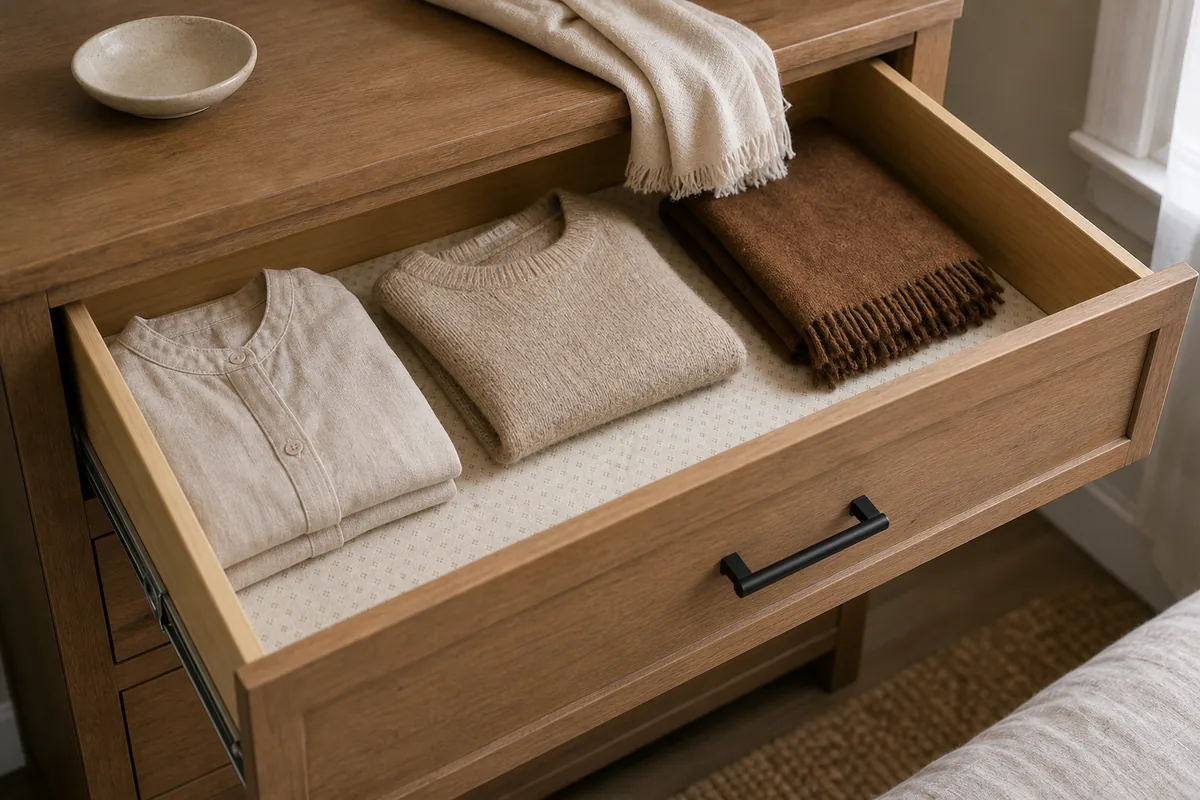
Drawer interiors are surfaces nobody decorates. Silverware drawers, dresser drawers, desk drawers, jewelry drawers, laundry hamper bottoms. Lining them with peel-and-stick creates the small pleasure of “open and see styled” without any external visual commitment.
Nobody else will see it. It is for the daily moment when you reach into the drawer and pattern peeks out from underneath your folded clothes or your spoons.
Choose subtle patterns for drawers: fine diagonal, cream-on-cream texture, or muted oat dot. The pattern is intentionally low-contrast so the clothes or contents stay the visual focal and the wallpaper reads as a quiet styled background, not a competing pattern.
- Works on silverware drawers, dresser drawers, desk drawers, jewelry drawers, hamper bottoms
- Cut to drawer-bottom dimensions (measure interior, not exterior)
- Use heavier-weight wallpaper for drawers that slide frequently
- Choose subtle patterns. Bold inside drawers competes with stored items
- Skip drawers you reorganize every week (more wear, more pull-up)
- Ideal as a beginner-test before doing a wall
Ceiling Accent (The 5th Wall You Never Use)

The ceiling is real estate nobody decorates. Pattern looking down adds vertical dimension to a room. Particularly effective in low-ceiling rentals because it draws the eye up and makes the ceiling feel taller rather than oppressively low.
Bedrooms and dining rooms are the best candidates because those are the rooms where people lie down or sit and look up. Living rooms with high traffic patterns benefit less because nobody pauses long enough to look at the ceiling. The application requires a two-person job. One on a ladder, one passing strips.
- Works best in bedrooms (you lie down and see it) and dining rooms (you sit and look up)
- Two-person job: one on ladder, one passing strips
- Skip popcorn ceilings. Texture prevents adhesion
- Skip glossy/painted ceilings without testing in one corner first
- Paint walls a related neutral so the ceiling reads as deliberate accent
- Lower ceilings benefit most (8-9 ft). The eye is drawn up and feels taller
Old Dresser, Nightstand, or Table Top Refresh
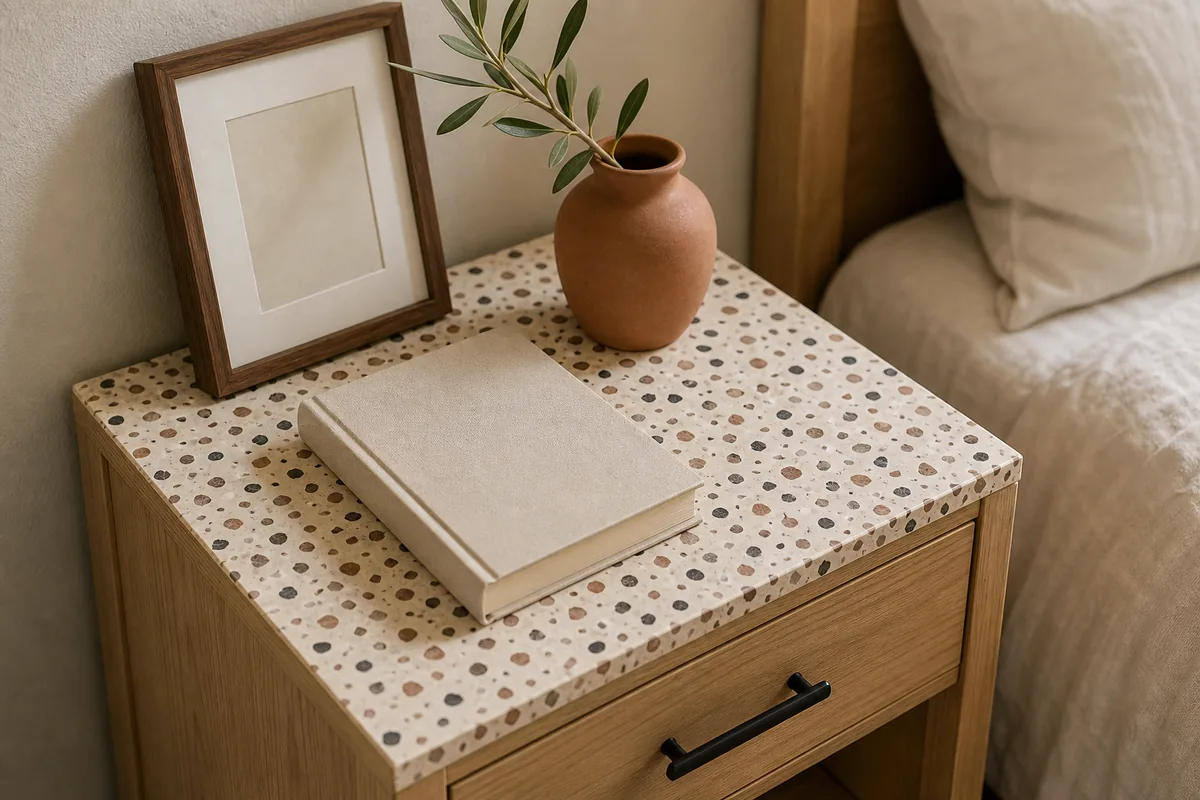
Old or thrift furniture with worn top surfaces is the easiest peel-and-stick project nobody talks about. Five dollars of wallpaper covers a scratched dresser top, a beat-up nightstand surface, or a dated desk. The piece reads like a new buy rather than a hand-me-down.
This is the lever that converts thrift-store and dollar-store finds into something that actually looks intentional in the apartment. Sand any rough spots smooth first because adhesion fails on rough wood. Cut wallpaper one inch larger than the top, then trim to exact edge with a utility knife after pressing it down.
- Works on dresser tops, nightstand tops, desk tops, side tables
- Sand rough spots smooth first. Adhesion fails on rough wood
- Cut wallpaper 1″ larger than the top, trim to exact edge after pressing
- Finish edges with clear matte sealer for daily-use surfaces
- Skip mid-century with veneer that lifts. Sand failure rate is high
- See the dollar store playbook for the same low-budget logic applied to art and accessories instead of wallpaper material
14 Peel and Stick Wallpaper Ideas for Every Room
- 1Behind-the-bed accent wall — biggest visual liftOne wall behind the bed papered in botanical or muted geometric pattern. The headboard wall is the bedroom’s natural focal so changing it changes the whole room. One wall only — not all four. Buy 25% extra for pattern matching.
- 2Behind-the-sofa accent wall — living room anchorLiving room wall behind sofa papered in abstract or tonal pattern. Anchors the seating area without adding furniture. Center the pattern on the visible wall above the sofa (bottom 2 ft hidden by sofa back anyway). Pair with one neutral throw pillow.
- 3Powder room — full-pattern small spaceSmall bathroom (30-50 sq ft) is the one room where all 4 walls papered works. Bold dark patterns read dramatic-not-overwhelming in small spaces. Trim corners with utility knife. Paint ceiling a related neutral to ground the visual.
- 4Kitchen backsplash refresh — counter strip18-24″ strip between counter and upper cabinets papered in geometric or stripe pattern. Renter alternative to tile. Use water-resistant peel-and-stick. Skip behind the stove (grease + heat fails adhesion). Pair with the budget home decor pillar for the broader playbook.
- 5Stair risers — vertical strips on each stepEach riser face (6-8″ tall) papered in geometric or stripe pattern. 12-step staircase = 12 small surfaces of pattern visible from below. $40 transforms the staircase. Treads + handrail stay plain wood.
- 6Inside upper cabinet doors — subtle reveal when openedPattern visible only when door opens — lowest-stakes test. Works on china cabinet, less-used pantry, medicine cabinet. Cover inside face only (not front). Skip cabinets you open every day (more peel stress).
- 7Bookcase or open-shelf backing — pattern behind objectsBookcase back panel papered creates depth visible between objects. Apply BEFORE filling shelves (much easier). Works on shelves with 30%+ open visible space. Pair with mostly-neutral objects so pattern reads.
- 8Inside drawers — hidden styled liningDrawer interior papered creates the small pleasure of “open and see styled.” Works on silverware drawers, dressers, desk drawers, hampers. Choose subtle patterns (bold competes with stored items). Cut to drawer-bottom dimensions measuring interior.
- 9Ceiling accent — the 5th wall you never useFull ceiling papered in botanical or muted pattern. Best in bedrooms (you lie down and see it) and dining rooms (you sit and look up). Skip popcorn ceilings (no adhesion). Two-person job — one on ladder, one passing strips.
- 10Old furniture refresh — dresser, nightstand, table topTop surface of thrift or cheap furniture papered = piece reads like a new buy for $5-$15. Sand rough spots first. Cut 1″ larger then trim with utility knife. Finish edges with clear matte sealer for daily-use surfaces. Pair with the dollar store decor playbook for art and accessories.
- 11Vanity backsplash strip — 4-6″ above sinkNarrow strip just above bathroom sink. Renter alternative to tile or repainting splash zone. Use water-resistant peel-and-stick. Skip directly behind faucet (highest water exposure). Strip aligns flush with bottom edge of vanity mirror above.
- 12Hallway or entryway accent — narrow space densityOne full wall in a narrow apartment hallway papered. The other wall stays plain. Entryway is first impression + 30-second sight line. Skip patterns with sharp directional lines (hallway proportions distort them).
- 13Closet interior — open door surprise revealBack wall of closet papered — one wall, not all sides. Functional space becomes curated reveal each time you open the door. Apply before filling closet with clothes (easier access). Works on bedroom, linen, coat closets.
- 14Cabinet or closet door front — door panel refreshFront face of door papered = whole piece feels redone. Use heavier-weight wallpaper for high-touch surfaces. Edges crisp with utility knife. Skip raised-panel doors (pattern distorts). Flat-panel doors are cleanest canvas.
styledhomenotes.com
Vanity Backsplash Strip (4-6″ Above the Bathroom Sink)
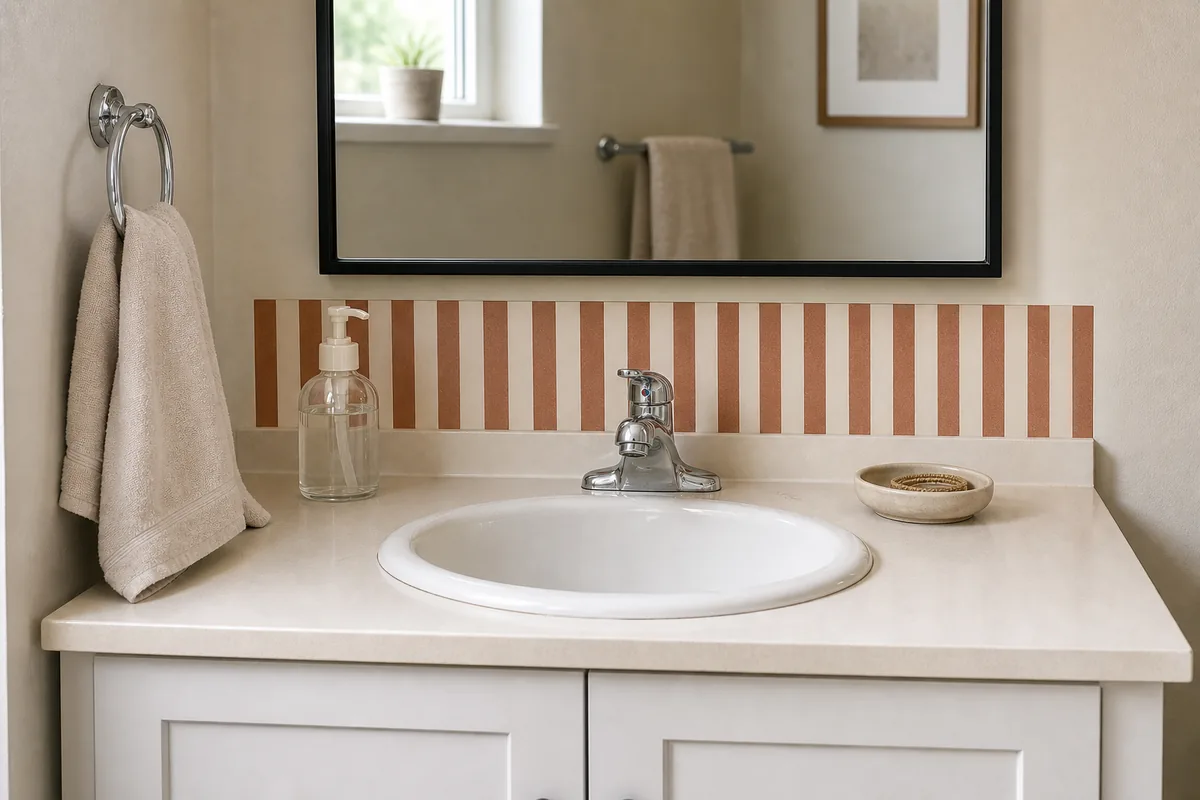
A narrow four-to-six-inch strip of wallpaper just above the bathroom vanity sink is the quick-fix focal for the room that gets the most water exposure of any surface in the apartment. The strip fixes splash-zone wear, where the wall behind the sink usually shows water spots and toothpaste splatters over time.
It adds a deliberate pattern element that the eye reads as a designed detail rather than a stain cover-up. This is the renter alternative to installing tile or repainting the wall behind the vanity. Measure vanity width times four to six inches tall. Use water-resistant peel-and-stick specifically rated for bathroom humidity.
- Measure vanity width × 4-6″ tall strip
- Use water-resistant peel-and-stick rated for bathroom humidity (not regular paper)
- Skip directly behind the faucet. Most water exposure causes lift
- Strip aligns flush with the bottom edge of the vanity mirror above
- Works on rental bathroom vanities with builder-grade laminate or formica
- Low-commitment trial for renters. Peels off without paint damage
Hallway or Entryway Accent (Narrow Space = High Pattern Density)
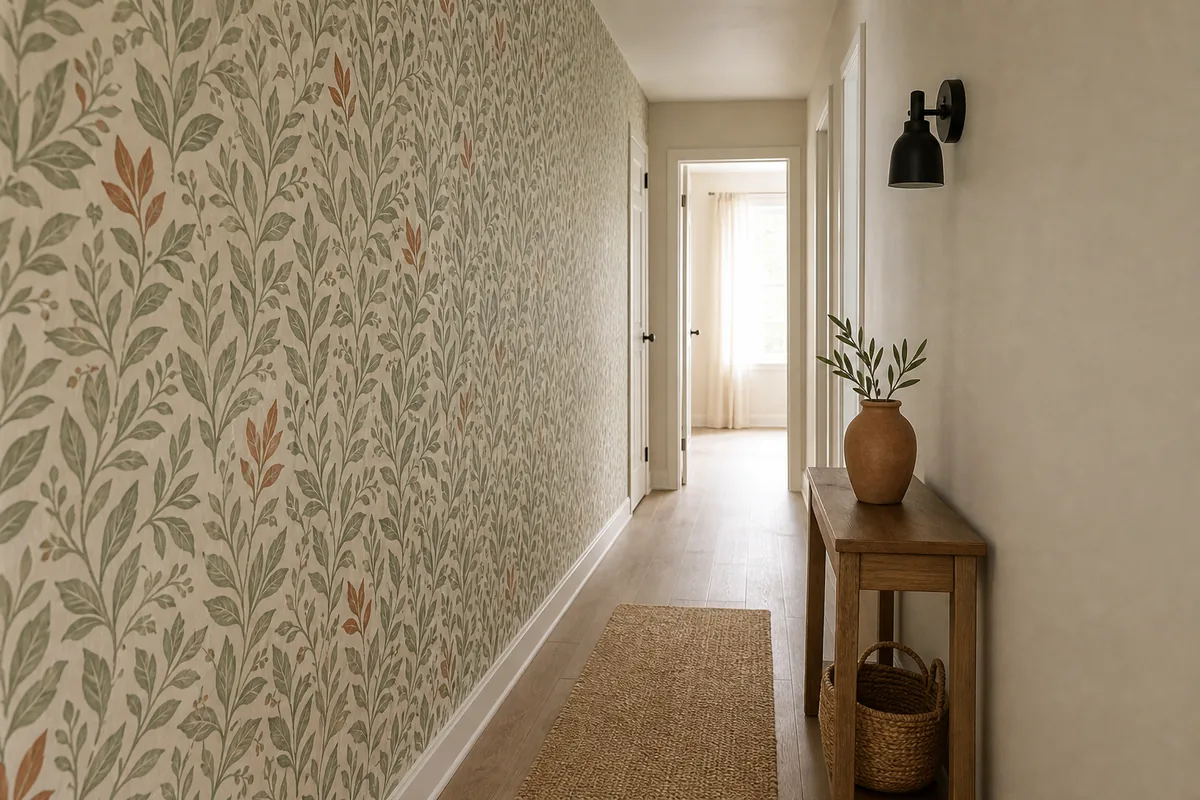
Apartment hallways are small enough that one full-pattern wall transforms the whole transition space. The hallway is also the first thing visitors see when arriving. Papering one wall turns the entryway into a thirty-second sight-line statement before guests reach the living room.
The narrow proportions of a typical apartment hallway, three to four feet wide by eight to twelve feet long, make this the rare place where a bold pattern in scale actually works. Cover one wall in the hallway. Typically the long wall, not both walls. Both walls papered creates a closing-in tunnel effect; one wall keeps the hallway feeling like a passage.
- Cover ONE wall in a hallway: the long wall, not both walls
- Measure ceiling height × hall length before buying
- Start from the top center and work outward toward the ends
- Skip patterns with sharp directional lines. Hallway proportions distort them
- Works in narrow apartment hallways (4-6 ft wide × 8-12 ft long)
- Tonal botanicals, fine geometrics, abstract. Avoid maximalist or directional
Closet Interior (Open the Door, See the Pattern)
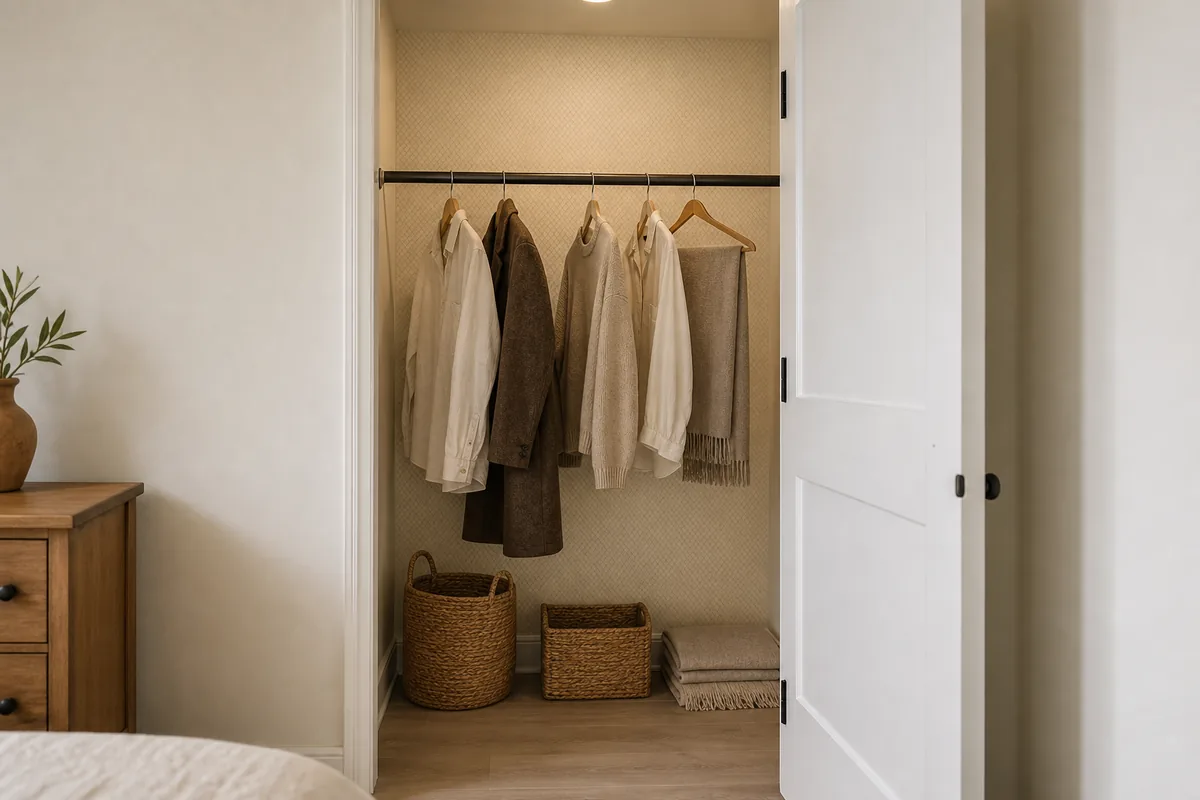
Closet interior wallpaper turns a functional storage space into a curated reveal. Opening a closet door is a small pleasure if the back wall is patterned. A moment of “oh, that is nice” every time you reach for a coat or a sweater.
The pattern choice here is intentionally subtle. A fine cream-on-cream diagonal or a faint diamond texture so the wallpaper is the quiet styled background and the clothes stay the visual focal when you open the door.
A bold pattern inside a closet competes with the clothes hung in front and creates visual noise. A subtle pattern reads as “this closet feels styled” without anyone being able to name why.
- Cover the back wall of the closet (one wall, not all sides)
- Choose intentionally subtle patterns. Bold inside the closet competes with hung clothes
- Apply before filling with clothes for easier access
- Works on bedroom closets, linen closets, coat closets
- Skip busy storage closets. Wallpaper hidden behind shelving systems
- Ideal candidate: walk-in closet back wall (highest visibility on open)
Front of Cabinet or Closet Doors (Door Panel Refresh)
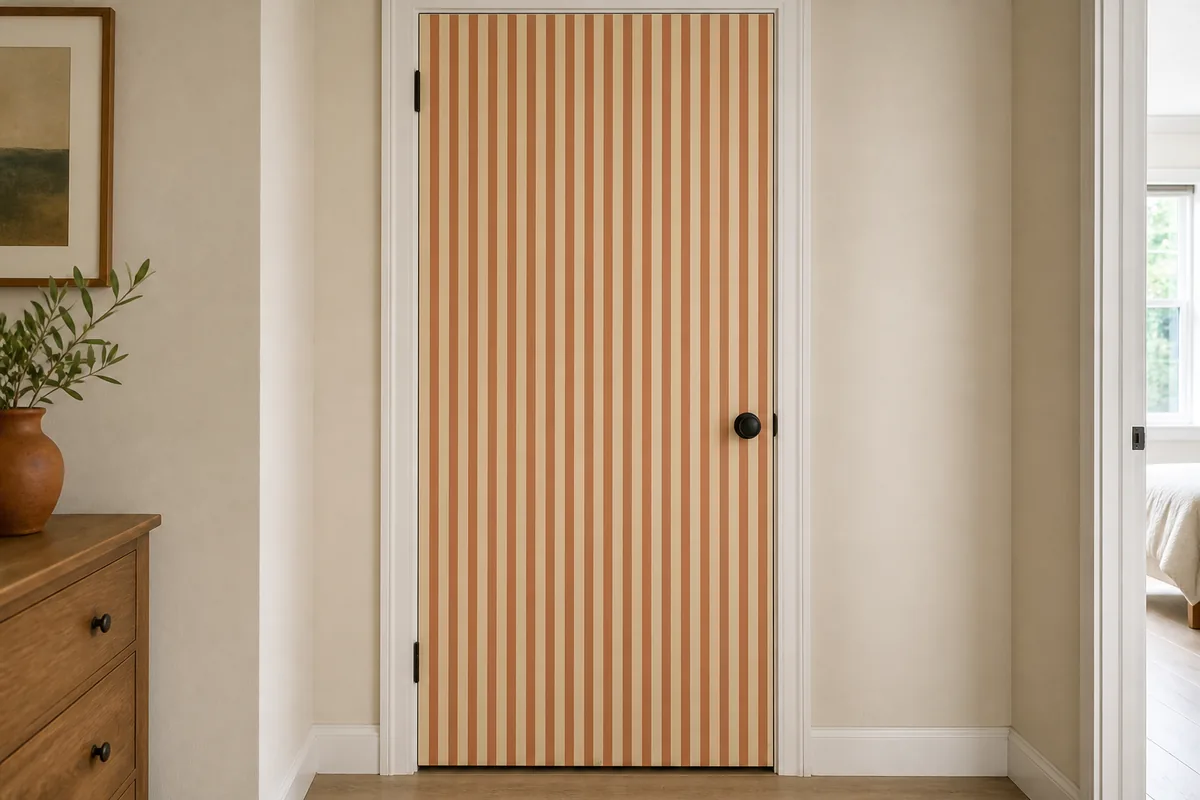
Applying peel-and-stick wallpaper to the front face of a closet or cabinet door turns the whole piece into something that feels redone. This is the bigger-surface variant of the inside-cabinet idea. More visible, more dramatic, and more commitment because the wallpaper is the first thing you see when you walk into the room.
A bedroom with one closet door papered in a bold pattern feels designed. A kitchen with two upper cabinet door fronts papered feels intentional.
Use a heavier-weight wallpaper for high-touch surfaces because door fronts get pushed, leaned against, and bumped. The edges are the gotcha. Use a utility knife flush against the door’s perimeter for a crisp finish, and skip raised-panel doors because the pattern distorts on the inset or raised areas.
Fourteen places. You will not do all fourteen on one weekend. Pick three or four that target your apartment’s specific weakness.
A first-time wallpaper installer leans on ideas 6 (inside cabinet doors), 8 (drawers), and 13 (closet interior). Small surfaces, low stakes, easy to peel off if you change your mind.
A renter wanting one dramatic before-and-after leans on ideas 1 (bed wall), 3 (powder room), or 12 (hallway). Bigger commitment, bigger payoff, still fully reversible.
A furniture flipper leans on ideas 7 (bookcase backing), 10 (dresser top), and 14 (door panels). Turn the cheap thrift find into the styled accent without paint or sanding.
The fourteen ideas compound. Once two or three are in the apartment, the rental starts to feel like it was decorated, not just furnished.
- Works on closet doors, pantry doors, bathroom cabinet doors
- Use a heavier-weight wallpaper for high-touch surfaces
- Edges are the gotcha. Utility knife flush against door edge for crisp finish
- Skip raised-panel doors. Pattern distorts on inset or raised areas
- Flat-panel doors are the cleanest canvas for door-front application
- Low-cost transformation: $20-$40 per door, fully reversible