12 Pantry Shelf Organization Ideas That Make Every Shelf Earn Its Keep
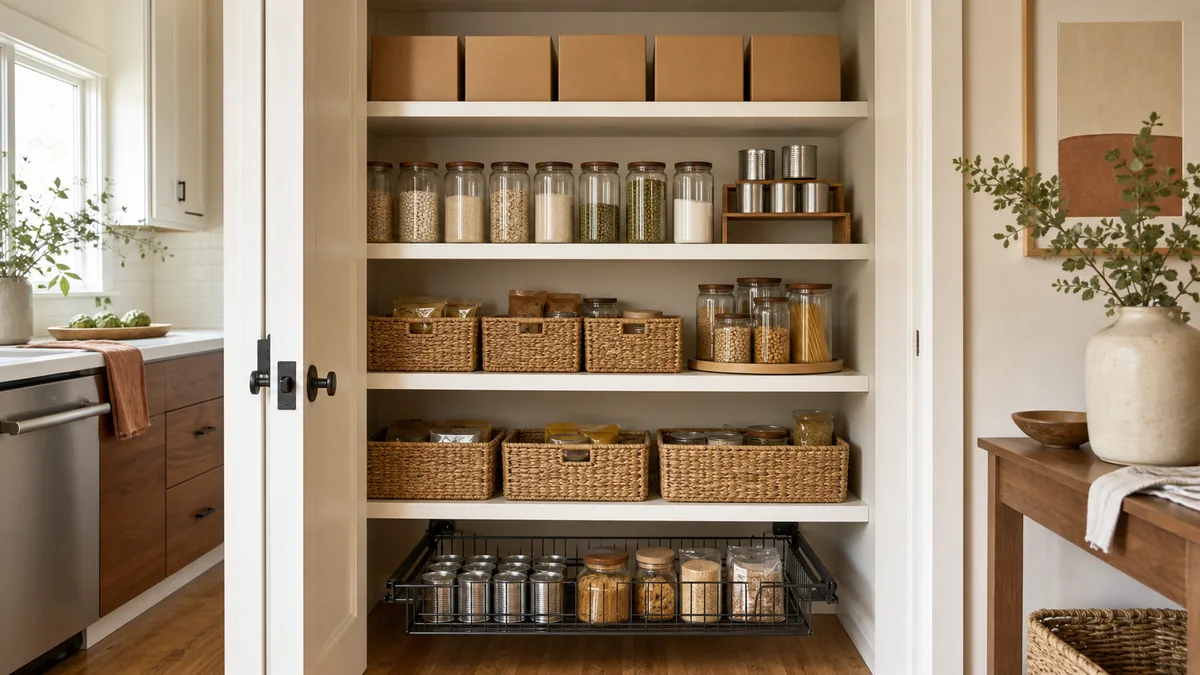
A pantry rarely fails for lack of space. It fails because every shelf is treated the same. Five identical planks holding mismatched bins, with the back third of each shelf disappearing into a cave you only revisit when something rolls out.
The answer is structural, not bigger. Each shelf gets one decision: what height, what container, what role. Once each shelf earns its own job, the pantry stops being a hole and starts being a system.
These twelve moves are shelf-level, not whole-pantry. For the bigger zoning logic, our broader pantry organization ideas guide covers labels and bins across the whole closet; this guide goes one layer deeper, into the shelf itself.
From tuning adjustable shelves tight to row height to turning the bottom deep shelf into a pull-out drawer, these twelve moves work shelf by shelf so the whole pantry stops swallowing what you store. Jump to the fix you need first.
- 1Set adjustable shelves to each item’s true height
- 2Add tiered risers so back-row cans are visible
- 3Slip an under-shelf basket into the air gap
- 4Drop a lazy susan on the deep shelf
- 5Line up bins front-edge flush for a clean visual line
- 6Label the shelf front, not the bin
- 7Daily on eye level, heavy on the bottom, light on top
- 8Group by meal on one shelf, not by category across many
- 9Turn the bottom deep shelf into a pull-out drawer
- 10Use the door back as an extra skinny shelf
- 11Cap the top shelf for backstock only
- 12Add a shelf edge lip so loose items don’t tumble
Set Adjustable Shelves to Each Item’s True Height
The factory shelf spacing is a guess at the average pantry user. It is almost never right for your pantry. If you have one shelf at fourteen inches holding cans that are four inches tall, ten inches of air is sitting unused above every can.
Pull the shelf pins. Drop each shelf to within one inch of the tallest item on that row. The same closet that “ran out of space” usually gives back a full shelf once every gap is closed.
- Walk through what each shelf actually holds, then measure the tallest item on each row
- Tune the shelf pins to one inch above that tallest item, no more
- Move taller groups (cereal, oil) to one dedicated tall shelf so the rest can drop low
- Recover the extra inches by adding a new shelf between two that just got tighter
- Recheck spacing once a season as what you buy in bulk changes
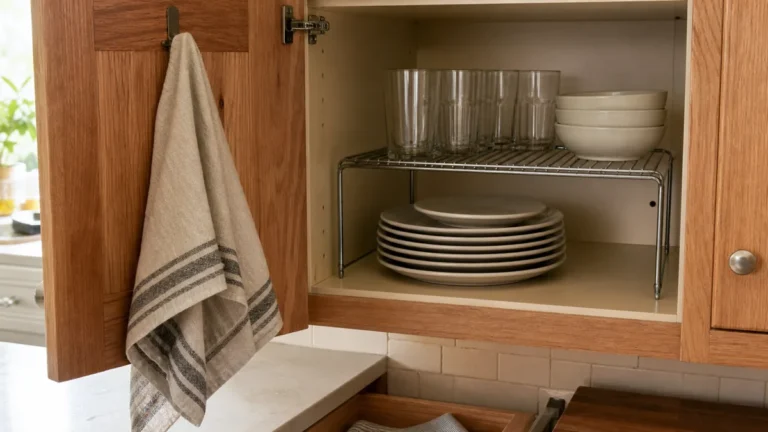
Add Tiered Risers So Back-Row Cans Are Visible
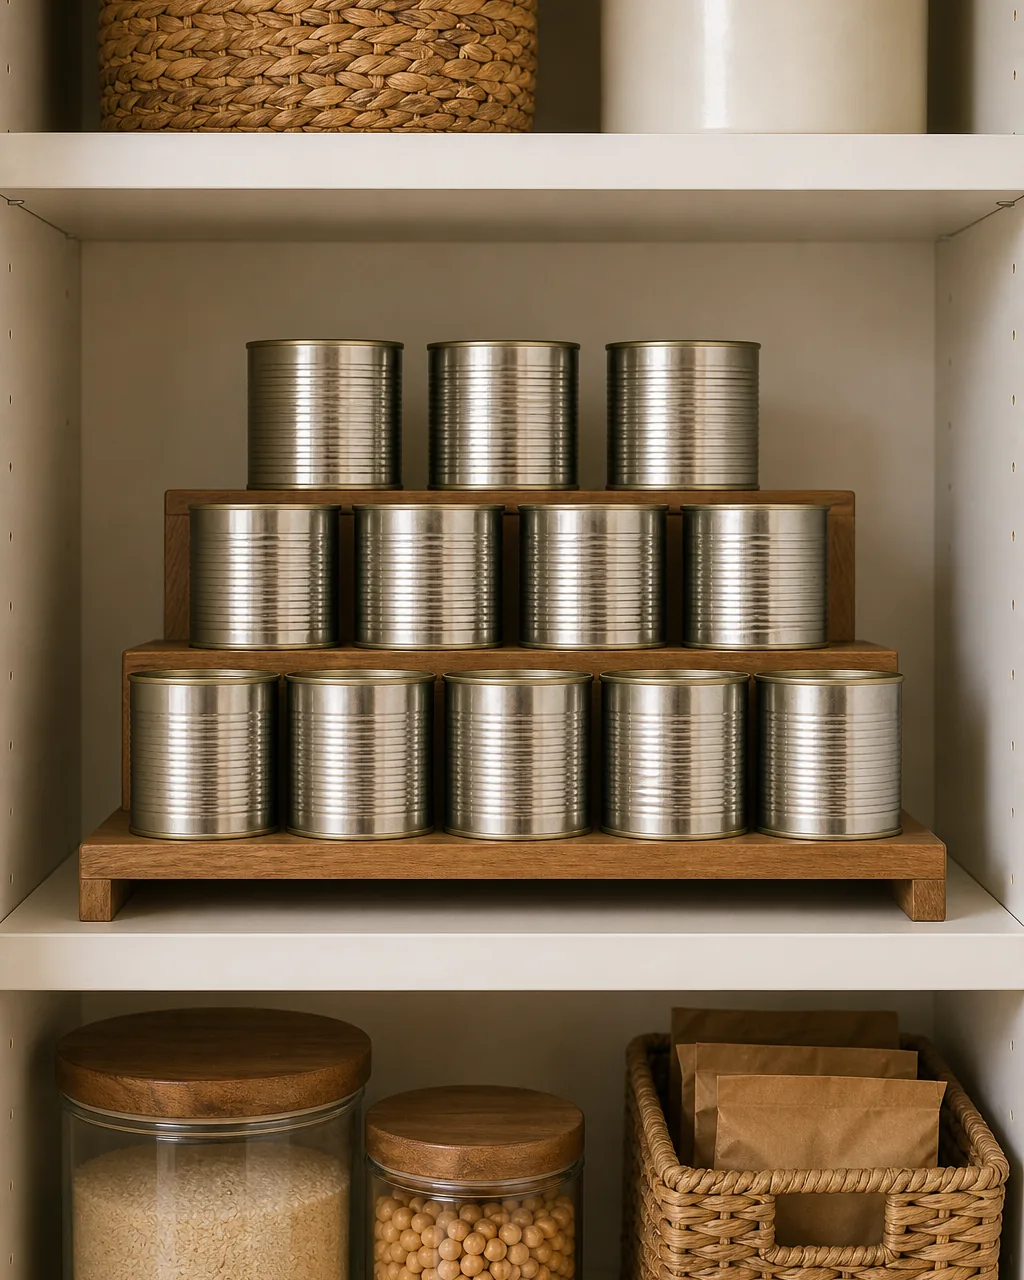
A flat shelf of cans hides anything beyond the front row. By the time you find the chickpeas behind the corn, you have pulled out four cans, lost track of what is there, and bought another can next trip.
A stepped riser fixes this with a piece of plastic or wood. The back row sits one tier up, the middle row in between, and the front row at the original shelf height. From the front of the pantry, all three rows read at once and nothing hides behind anything.
- Use a three-step riser sized to the back wall of the shelf, not the front
- Put the tallest or least-used cans on the highest tier so the daily reach is still on shelf level
- Group like with like across one tier so the visual still reads calmly
- Keep one tier reserved for jars rather than cans; mixing shapes per tier reads cluttered
- Skip the temptation to triple-stack cans; a riser is a row, not a tower
Slip an Under-Shelf Basket Into the Air Gap
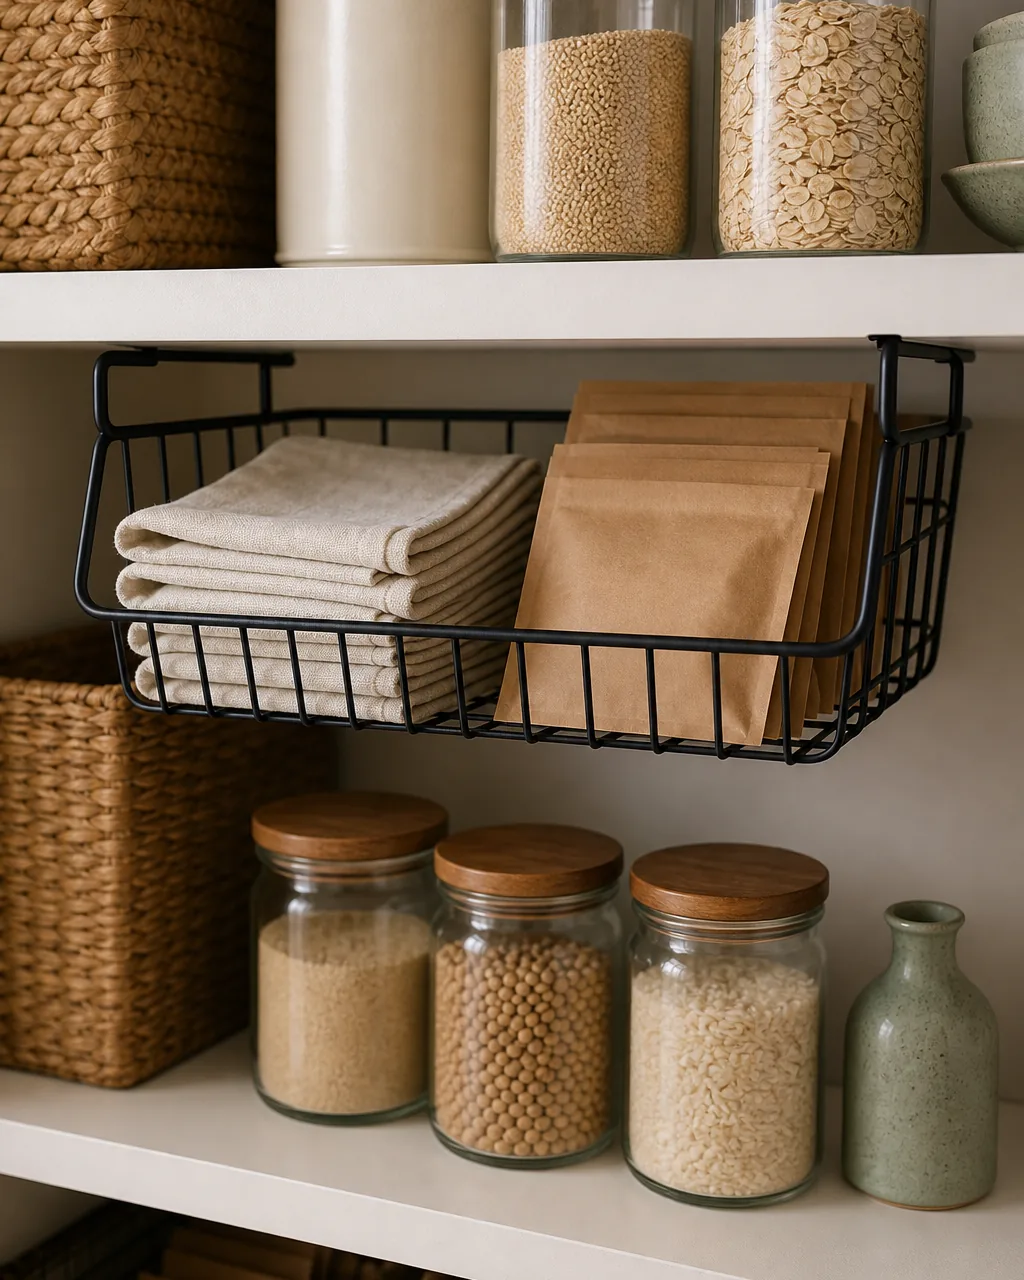
Even after you tighten the shelf spacing, every shelf still leaves a few inches of air below it. That air is storage you already paid for; the only thing missing is a hanger.
A clip-on under-shelf basket turns the gap into a half-shelf. Flat things land here: dish towels, napkins, foil pouches, sealed snack packs, flat tortilla packs. The original shelf above stays free for the rigid jars and cans it was built for.
- Match the basket width to the shelf above so it does not overhang
- Use the under-shelf for flat soft items only; rigid jars below it hit the basket bottom
- Clip baskets only on shelves where the gap below is at least four inches
- Choose matte black wire over chrome; chrome shows fingerprints and dust faster
- Avoid hanging two baskets in a row on the same shelf; one is a quiet add, two reads cluttered
You will not need all twelve at once. Find the problem below that matches your pantry today, and start with those two or three ideas.
Drop a Lazy Susan on the Deep Shelf
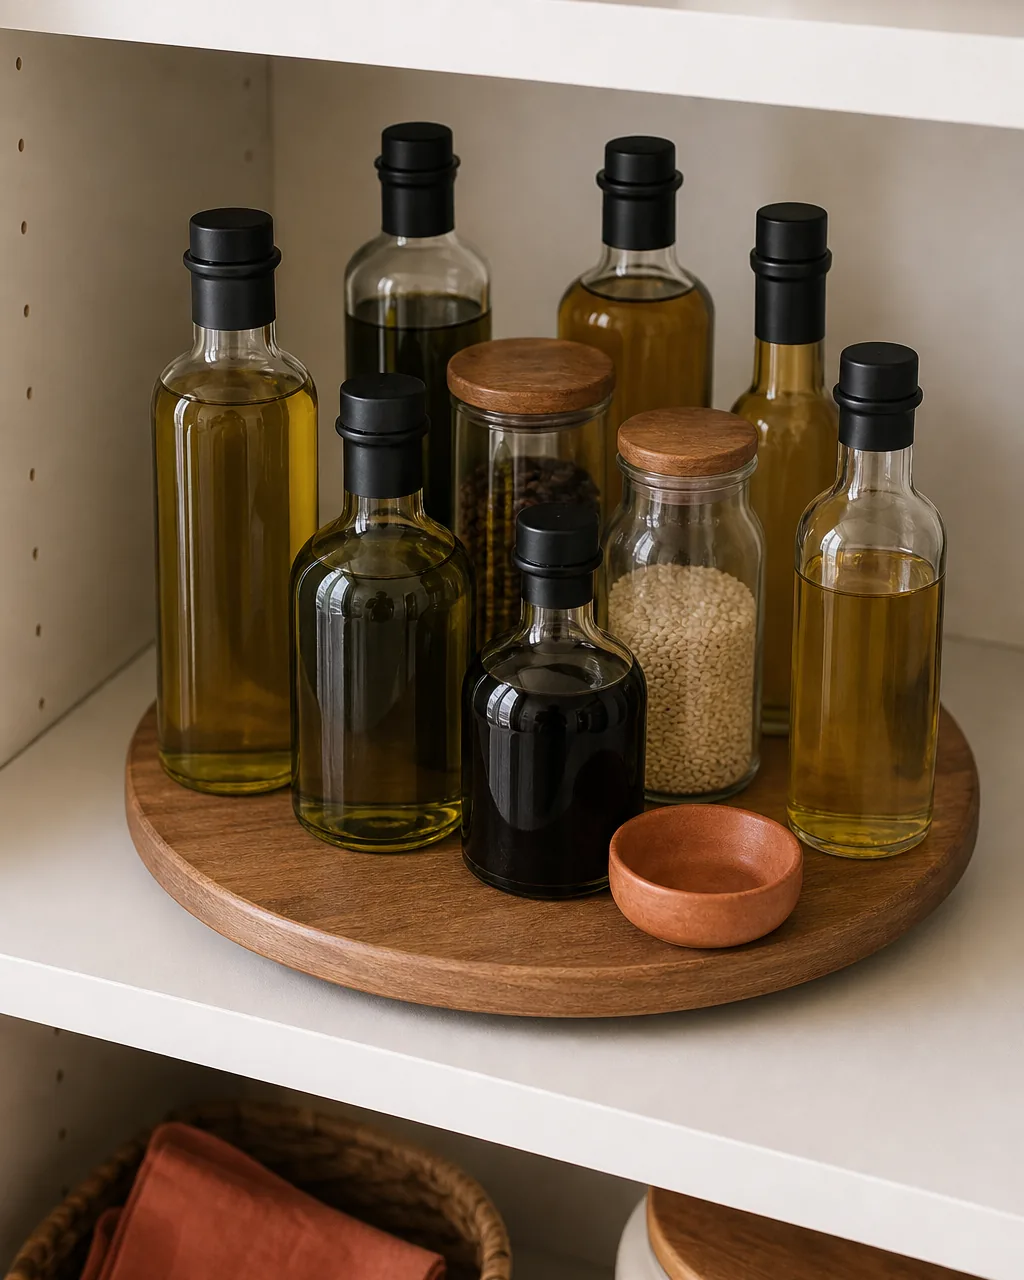
Any shelf deeper than fourteen inches creates a dead zone in the back. Bottles get pushed there during weekly shopping, forgotten, and rediscovered as expired oils six months later. The shelf is fine; the geometry is the problem.
A low turntable spins the back to the front. You see the whole inventory in one quarter turn, and the dead zone becomes the second half of an active shelf instead of a graveyard.
- Pick a low-profile turntable, an inch or two tall; tall risers steal vertical space
- Use it for round bottles and jars that share a height; mixing tall and short on a turntable wastes it
- Skip the turntable for soft-bottom bags and boxes that bunch and stop the spin
- Place the turntable centered on the shelf so it spins clear in both directions
- One turntable per shelf is plenty; two side by side jam each other constantly
Line Up Bins Front-Edge Flush for a Clean Visual Line
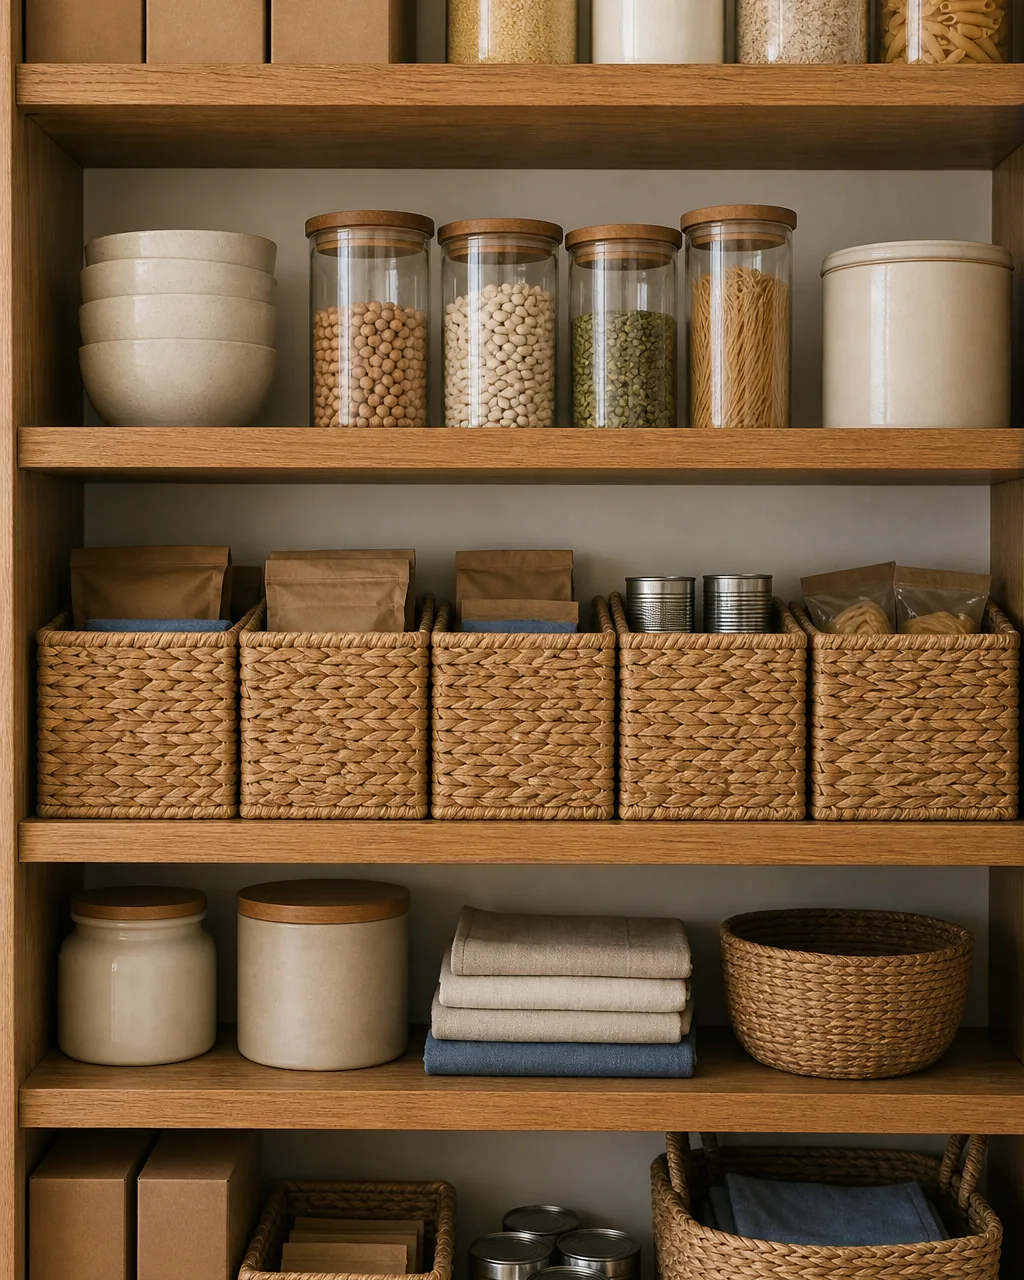
A shelf of bins where one is pushed back two inches and another sits flush at the edge reads as chaos even when the contents inside are perfectly sorted. The eye is tracking the front line, not what is in the bins.
Push every bin to the front edge. Even if the bins have different depths behind, the front line stays straight and the shelf reads calm. The space behind the shallow bins becomes hidden backstock for the same category.
- Push every bin all the way forward against the shelf-edge lip so the front rims align
- Use the depth behind a shallow bin to store a refill of the same item, not a different category
- Keep all bins on a single shelf at the same front-face height; varying heights breaks the line
- Choose bins with straight vertical fronts; tapered or curved bins fight the flush rule
- Resist mixing rectangular and round bins on the same shelf; the front line goes jagged
Label the Shelf Front, Not the Bin
Bin labels are a trap. The day you decide to put pasta where the rice was, you re-label two bins. Two months in, half the labels are wrong and the other half are gone.
A label on the shelf-front face fixes the geometry. The category lives at the shelf level, not the bin level. The bin is free to move, swap, or upgrade without ever touching a label, and your eye scans labels at one height across all shelves instead of dropping to the bin every time.
- Stick a thin removable label strip on the shelf-front wood face at the edge, not on the bin
- Keep labels minimal: one or two words; full sentences are read once and ignored
- Pick a removable adhesive strip so labels swap when the pantry plan evolves
- Align all label strips at the same vertical height on each shelf for a quiet rhythm
- Skip labels for the most obvious shelves; you do not need a label that says cereal
These four rules are what keep a pantry from sliding back into a cave of mismatched bins and dark back corners.
Daily on Eye Level, Heavy on the Bottom, Light on Top
The shelf you reach for most should hold what you reach for most. It sounds obvious, but most pantries break this on day one; the heavy bag of flour ends up at chest height because that was the empty shelf when it came home from the store.
Reassign by weight and frequency. Heavy bulk lives on the bottom, where dropping it is short and safe. Daily reach lives at eye level, where you stop hunting. Light, rarely-used backstock floats to the top, where weight does not matter. The rest of our broader kitchen organization playbook hangs on this same gravity rule.
- Put heavy sacks of flour, rice, and oils on the lowest shelf; injuries happen with heavy items overhead
- Reserve the eye-level shelf strictly for daily reach; coffee, oats, snacks, school lunch staples
- Float light backstock; paper towels, napkins, sealed packets; to the highest shelf
- Recheck the assignments quarterly; what you reach for daily shifts with the season
- Treat the eye-level shelf as the prime real estate; nothing rare or once-a-month earns that spot
Group by Meal on One Shelf, Not by Category Across Many
Category-first sorting reads tidy but works badly. Cereal on one shelf, jars on another, drinks on a third; making breakfast turns into a three-shelf scavenger hunt.
Meal-first sorting beats it. Pick the meal you make most often and give it a whole shelf. Coffee, oats, honey, granola, tea, and the cup all live together. The first decision of the morning becomes one shelf-grab, not three.
- Dedicate one shelf to the meal you cook most often; usually breakfast or weekday dinner
- Group everything that meal needs on that shelf; even items that “belong” with their category friends
- Keep one shelf left over for category-sorted items that span multiple meals
- Refuse to split a meal across shelves to keep categories pure; the meal wins
- Re-evaluate the meal shelf when family routines change; new school year, new shelf
Turn the Bottom Deep Shelf Into a Pull-Out Drawer
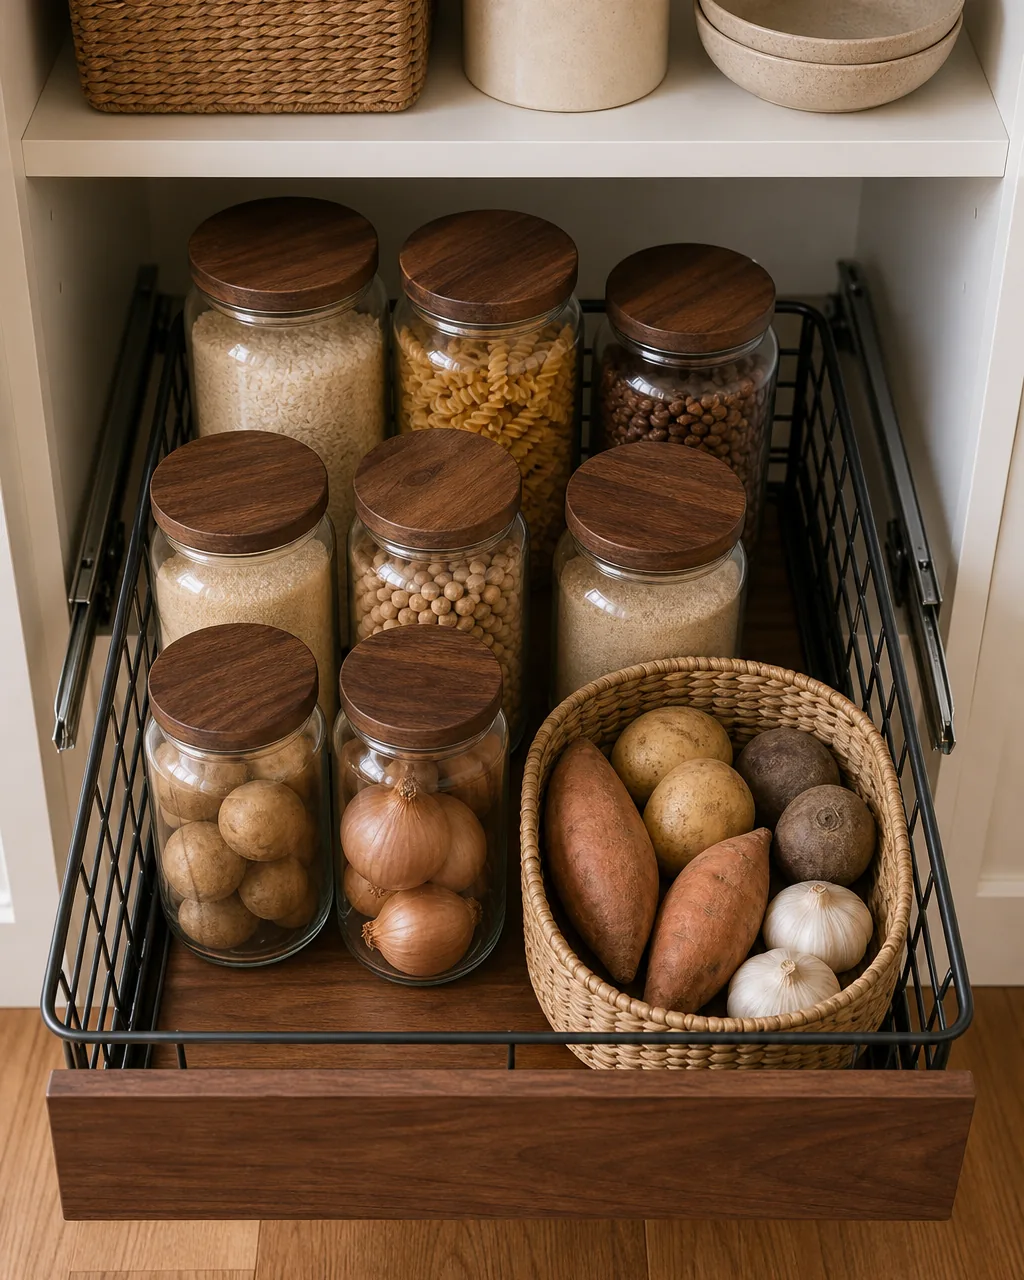
The bottom shelf is the worst version of the deep-shelf problem. Crouching to dig past the front row, then standing up holding something heavy, is the move that breaks a pantry routine on a Tuesday night. The same logic that drives our broader cabinet organization approach for kitchen lowers applies here too.
A pull-out basket or a sliding drawer converts that bottom shelf into something usable. The back of the cave comes out to meet you. You stand up once, not three times, and the back row stops being a black hole.
- Add a single pull-out basket or a slide-out drawer kit to the bottom deep shelf
- Match the slide-out width to the shelf opening so the basket clears the side walls
- Use the drawer for the heaviest or deepest items; potatoes, onions, big oil bottles
- Avoid stacking inside the pull-out; the point is one layer pulled to you, not a tower lifted
- Skip pull-outs on shorter shelves; they only earn their keep where reach is genuinely the problem
12 pantry shelf moves, one system that actually works
- 1Set adjustable shelves to each item’s true heightDrop each shelf to one inch above the tallest item so the unused air above every row becomes real storage.
- 2Add tiered risers so back-row cans are visibleA stepped riser lifts the back rows so every can reads from the front at once, nothing hiding behind.
- 3Slip an under-shelf basket into the air gapA clip-on basket turns the air gap below a shelf into a half-shelf for flat, soft items.
- 4Drop a lazy susan on the deep shelfA low turntable spins the deep back row to the front, ending the expired-oil dead zone.
- 5Line up bins front-edge flush for a clean linePush every bin to the front edge so the front line stays straight and the shelf reads calm.
- 6Label the shelf front, not the binPut the label on the shelf-front face so bins can swap, move, or upgrade without a relabel.
- 7Daily on eye level, heavy on the bottom, light on topHeavy bulk on the bottom, daily reach at eye level, light backstock up where weight stops mattering.
- 8Group by meal on one shelf, not by categoryGive your most-made meal a whole shelf so breakfast is one grab, not a three-shelf hunt.
- 9Turn the bottom deep shelf into a pull-out drawerA pull-out basket brings the deep bottom shelf out to you, so you stand up once, not three times.
- 10Use the door back as an extra skinny shelfAn over-the-door wire rack turns the empty door back into shallow, single-file shelving.
- 11Cap the top shelf for backstock onlyKeep the hard-to-reach top shelf for sealed backstock only; active jars stay at eye level.
- 12Add a shelf edge lip so loose items don’t tumbleA low front-edge lip catches round bottles and jars so nothing rolls off when you reach past.
styledhomenotes.com
Use the Door Back as an Extra Skinny Shelf
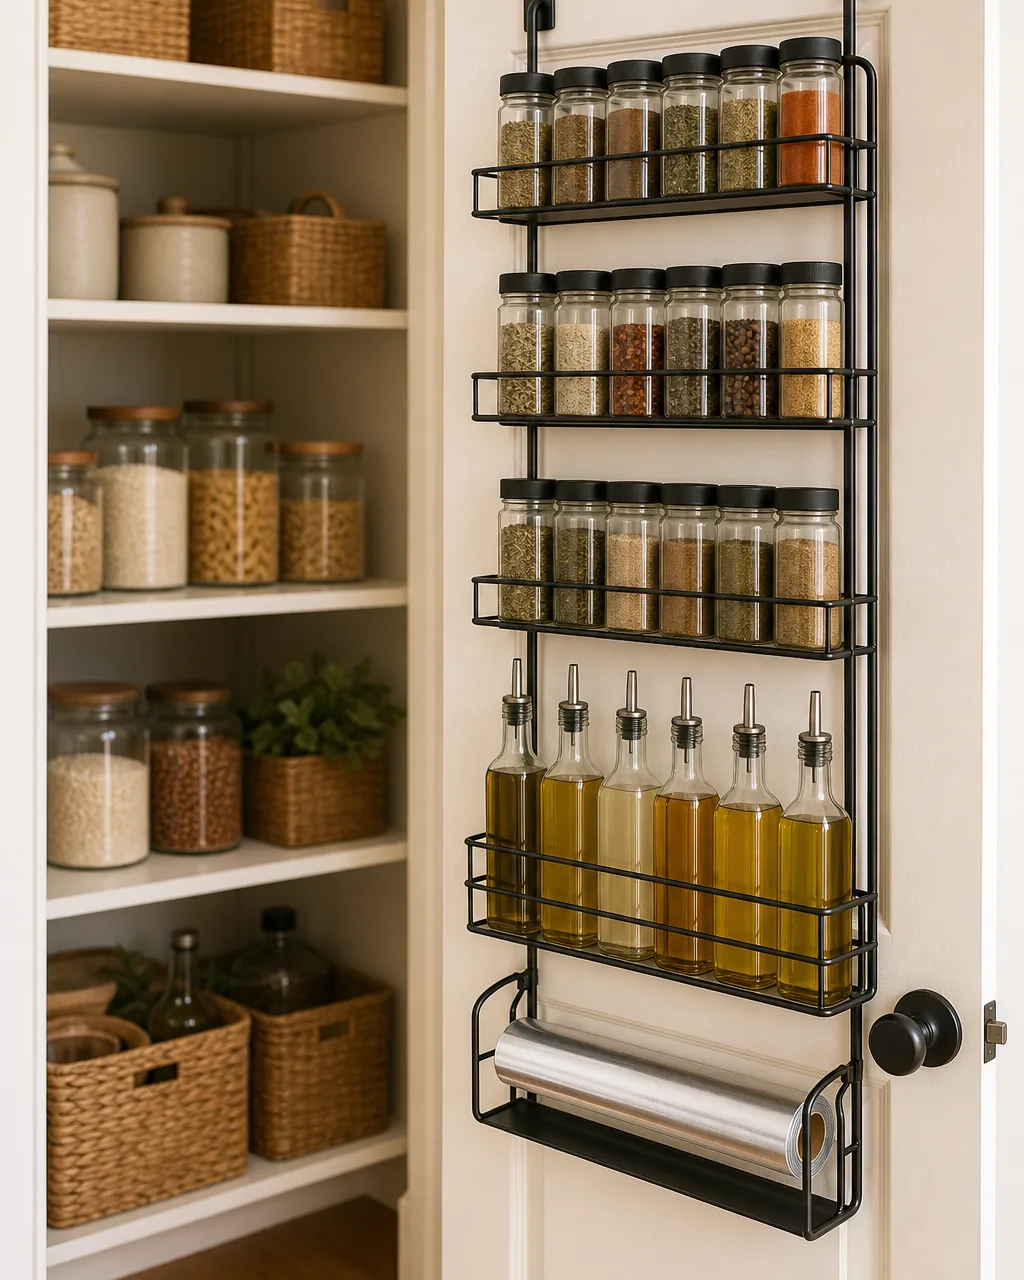
The inside of the pantry door is the most overlooked vertical plane in the kitchen. It is always there, always swinging into the room, almost always empty. Two square feet of storage sitting in plain sight.
An over-the-door wire rack turns it into shallow shelving. Spice jars, small oil bottles, foil rolls, and packet items live here in single file, where you see them all at once. The deep shelves behind get freed for the bulk that actually needs depth.
- Choose an over-the-door rack rated for the door weight; check hinges before loading it heavy
- Use it for shallow items only; spices, foil, plastic wrap, single-row bottles
- Keep the heaviest items low on the door so the hinges don’t strain
- Avoid loading the door rack with daily-reach items if the door is the room’s main pathway
- Leave a fingertip of clearance between the loaded rack and the closest shelf so nothing snags
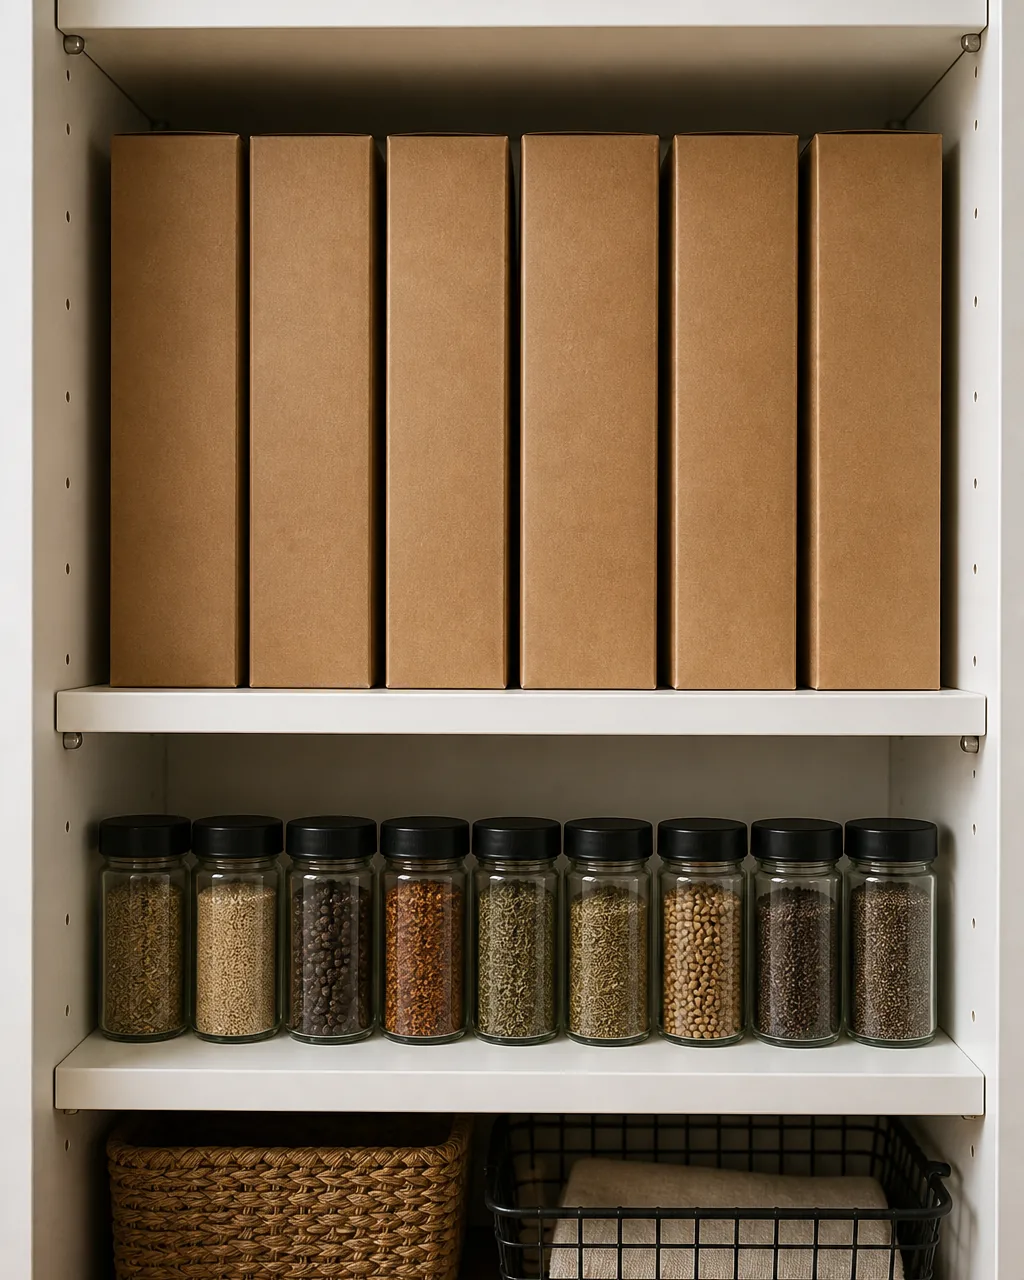
Cap Top Shelf for Backstock Only
The top shelf is the hardest to reach and the easiest to forget. It does its best work when you stop trying to make it a daily-use shelf and let it be the warehouse.
Reserve it strictly for backstock. Extra paper towels, the second sack of rice from the warehouse run, the unopened box of pasta. Active inventory lives in the middle shelves. Bulk floats up. The shelves you actually use stay clean because they are not also holding the spares.
- Move every “extra” or “second one” of a daily item to the top shelf; the active jar stays at eye level
- Use the top shelf only for sealed, shelf-stable items; opened bags lose freshness up there
- Standardize on plain kraft or matte boxes so the top shelf reads calm from below
- Refill the active jar from the top shelf weekly so the warehouse stays current
- Resist the urge to mix daily-reach items with backstock; the rule only works when it is strict
Add a Shelf Edge Lip So Loose Items Don’t Tumble
A round bottle on a flat shelf will roll, eventually. Pull the bin in front of it and the soft nudge becomes a fall. By the time you sweep up the broken glass, you have already committed to a new pantry rule.
A low wood or metal lip strip across the shelf front catches everything. Spice jars, oil bottles, round cans, small packets. The shelf still reads open; nothing tumbles when you reach past it.
- Add a slim wood or metal lip strip along the front edge of any shelf that holds round items
- Keep the lip low; half an inch is plenty; so you can still see what is behind it
- Use a removable adhesive lip on rented kitchens; permanent screws are not worth the deposit
- Reserve lips for shelves with loose round items; flat boxes do not need the protection
- Refresh the adhesive once a year so the lip stays seated when the bin slides past it
A pantry that swallows things is rarely a pantry that is too small. It is a pantry where every shelf is asked to do the same job. Once each shelf gets its own height, its own container, and its own assignment; daily on eye level, heavy on the bottom, backstock on top, the door doing extra work; the same five planks finally start earning their keep.